


A tutorial for using 3V LEDs with a battery holder and switch unit is below. These instructions may be used when lighting any small project (dollhouses, dioramas, art projects, railroad scenes, and more) with tiny 3 Volt LEDs.
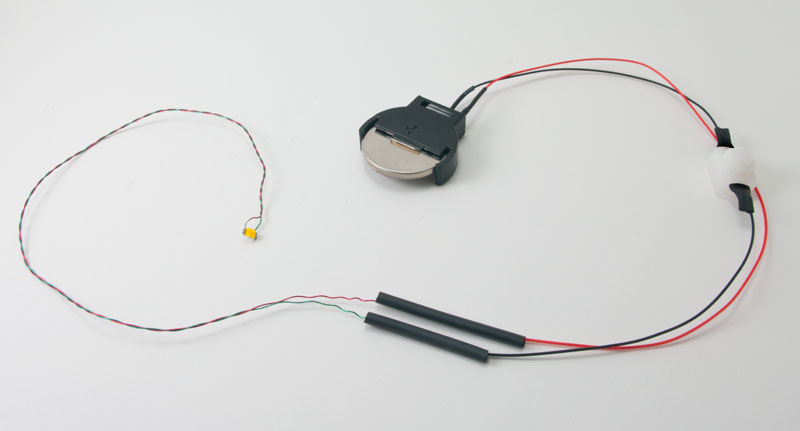 |
| An LED connected to a battery holder and switch unit |
You will need:
- Glitter house kit or other project to be electrified
- 3V LED light
- Battery holder, switch, 3V battery, shrink-tube
- Wired connectors (optional - for extending the length of the wires)
- Hairdryer
- Tweezers
- Transparent tape
- Acrylic or enamel paint in white or cream
If you already have a 3V LED, you may wish to purchase the battery holder, switch, battery and shrink-tube to complete your LED setup.
If you want the 3V LED lights only, they may be purchased separately.
First, a basic introduction to LEDs (the tutorial follows):
Why LEDs?
LEDs are much more efficient than incandescent bulbs.
- They don't become hot (perfect for glitter houses, Christmas trees, and places where the lights will be dangerously close to flammable and/or fragile items).
- They last a LONG time - 10 years/10,000 hours. It's very unlikely that you will have to tear apart your project to replace an LED.
- They provide a lot of light. In fact, sometimes they are brighter than is needed for our miniature projects. Thankfully there are ways to cut down the amount of light (discussed below).
- They are tougher to break than an incandescent bulb because there isn't a filament.
What types of projects does this 3V LED system work well for?
What kind of power source do I need for LED lights?
LEDs for miniaturists are typically available in 3V, 9V and 12V. Depending upon the type of LED, you may use a:
- 3V coin cell battery
- 9V battery
- 9V regulated power adapter (it's important to check that the adapter is regulated; most are not)
- 12V dollhouse power supply
IMPORTANT: Make sure that the LED that is purchased is compatible with the power source that you intend to use it with.
 |
| A blue LED lends an eery look
|
All of the LEDs purchased from True2Scale should be used with a 3V coin cell battery CR2032, NOT a dollhouse power supply or a 9V battery. The 3V battery is preferred because it is small and allows for the freedom to move the display around without having to worry about hooking it up to a stationary power supply (an outlet for example). Also, the battery allows up to 10 lights to run for about 12 hours. 3 lights will run on a single battery for about 40 hours. The battery may be changed.
I recommend using no more than 10 LEDs per battery. The more LEDs used, the sooner the battery will need to be changed.
 |
| This hutch, decorated by After Dark Miniatures, contains 8 glitter houses
|
How to Work with Battery Powered LEDs
Conducting a Trial Test
Before assembling a glitter house or other project, you may wish to check the LED.
- Slip the battery into the battery holder (A), making sure that the plus (+) side of the battery is on the same side as the plus (+) sign on the battery holder.
- Twist the LEDs red wire to the red wire on the switch (B). Then, twist the other wire to the black wire on the switch.
- Turn on the switch. If it doesn't light up, take it to a dark room to see if it is lit (this is a very small light after all). If it does not light, make sure that the battery is in the battery holder correctly. Also check that the solder joints on the red and green wires have not been pulled apart from the LED.
- Untwist the wires.
 |
| Battery and battery holder (A), Switch (B), Shrink-tube (C), LED (D) |
Changing the Brightness of the LED
When I wish to dim the brightness of the LED, I paint over the bulb with a white or cream color paint. Acrylic or enamel work just fine. If a dimmer light is desired, you may wish to use 1/4 watt resistors. These come in a package of varying tolerances. You'll want to try different color resistors out to see which tolerance you prefer. You will need 2 resistors. 1) Slide the shrink tube over the wires. 2) Twist the red wire of the LED to the first resistor; twist the red wire of the switch to the resistor. 3) twist the green wire of the LED to the second resistor; twist the black wire of the switch to the other end of the second resistor. 4) Slide the shrink tubes over the connections and heat with a hair dryer until they have shrunk tightly around the connections.
Making the LED Wires Shorter
Straighten the wire of the LED. Figure out the length that you want the wires to be. If the wires need to be shortened, the ends may be re-exposed by gently sanding with a piece of fine sandpaper.
Attaching the LED to a Glitter House
Attaching the LEDs to the glitter houses BEFORE assembling the houses makes lighting them much easier! To do so, cut a sliver size piece of transparent tape (a tweezers works well to handle the tape and keep it sticky). Attach the LED to the inside of a PRE-CONSTRUCTED, FLAT glitter house, with the yellow side facing out (a green arrow is printed on the back side of the LED). Clamp the LED to the house with a tweezers and bend the wires to exit the back of the house. Don't worry about hiding the wires; they are so fine that they will not cause gaps, and may be covered with white paint, glue and glitter to blend into the snow. Glue the base to the house and decorate the house according to the directions supplied with the glitter house kit.

Connecting the LED to the Switch
Slip the black shrink-tubes (C) over the ends of the wires on the switch (B). Push them toward the switch. As before, you will twist the red wires together; and twist the black wire and the remaining wire together. Pull the black tubes down to cover the connections. Heat with a hair dryer until the black tubes shrink down to fit tightly around the wires. Enjoy your beautifully lit project!
Adding Additional LEDs to One Battery Holder and Switch Unit
This is the method that I teach in workshops:
- Remove the colored varnish (red and green) from the ends of all the wires. I prefer approx. 1-1/2" of VERY SHINY copper showing. The easiest way is to burn it off with a lighter. Then use fine sandpaper to remove the charring. Again, the wires should be shiny copper when you are finished. The key to a good connection is removing the varnish completely.
- Hold all of the red wires PARALLEL. Twist the wires together VERY tightly. Do the same with the green wires.
- Strip about 1" of the insulation from the wires on the switch unit. Put shrink tubes over the wires. Hold the red wire on the switch unit PARALLEL to the red wires of the LEDs. Twist together very tightly. Do the same with the black wire/green wires.
- Fold the twisted portion of the wires down and pull the shrink tube over top of the bundle of wires. Test the connection. If it works without flickering, you're ready to heat the shrink tube with a hairdryer.
- Heat the shrink tubes with a hair dryer until the tubes have shrunk completely around the connections.
I recommend using no more than 10 LEDs per battery. The more LEDs used, the sooner the battery will need to be changed.
Using Wired Connectors with LEDs and a Battery Holder and Switch Unit
If a project requires longer lentghs of wires, we recommend using wired connectors. The perfect solution for extending the length of wires when lighting a project, wired connectors also provide the ability to easily disconnect the wires from a project when moving the project.
To add wired connectors to LEDs and battery holders:
- Push the female and male ends of the wired connectors tightly together.
- Remove the colored varnish (red and green) from the ends of all the LED wires. I prefer approx. 1-1/2" of VERY SHINY copper showing. The easiest way is to burn it off with a lighter. Then use fine sandpaper to remove the charring. The wires should be shiny copper when you are finished. The key to a good connection is removing the varnish completely.
- Hold all of the red wires PARALLEL. Twist the wires together VERY tightly. Do the same with the green wires.
- Strip about 1" of the insulation from the wires on the battery holder/switch unit and the wired connector. Put shrink tubes over all 4 wires.
- Hold the red wire on the wired connector PARALLEL to the bundle of red wires of the LEDs. Twist together very tightly. Do the same with the black wire/green wires.
- Fold the twisted portion of the wires down and pull the shrink tube on top of the bundle of wires. Test the connection with the 3V battery. If it works without flickering, you're ready to heat the shrink tube with a hairdryer.
- Hold the red wire on the battery holder/switch unit PARALLEL to the red wires of the wired connector. Twist together very tightly. Do the same with the black wire/green wires.
- Fold the twisted portion of the wires down and pull the shrink tube on top of the bundle of wires. Again, test the connection with a battery. Heat the shrink tubes with a hair dryer until the tubes have shrunk completely around the connections.
